Mapping for VCTF4
This page serves as a guideline for creating VCTF4 maps covering several aspects. It is no mapping tutorial, but a source of information for mappers who'd like to start building a VCTF4 map.
1 – Design aspects
There are a few certain aspects that should already be considered at design time - even if you "simply" port an existing VCTF map to VCTF4.
1.1 – Map size
Twice as many teams does not mean that the map needs to be twice as large. Even though there are more teams, the amount of players per team is roughly the same as before, if not less. Therefore, be careful not to oversize the bases and neither the central battlefield (provided there is one).
1.2 – Navigation help
Navigation help is a topic that has a way higher priority on VCTF4 maps than on casual VCTF or CTF maps. In VCTF, you walk or drive from base A to base B. Yes, a good map provides several options in doing so, but the direction is roughly a straight line in most cases. In VCTF4, this is different. Depending on which team's flag you are currently trying to capture, you need to take a different route. Depending on the map layout, you may even have to pass another team's base first.
Therefore, be sure to provide a lot of navigation help in the form of colorized textures, team banners and monitors, colored arrows, lighting and whatever else you can come with.
It is generally a good idea to study the maps included in the VCTF4 release package. They have been picked because they do a good job in helping you navigate. You are free to pick navigation help elements from them, a select bunch is also described below.
1.3 – Performance
A VCTF4 map means there are 4 bases with pickups, vehicles and possibly lots of decoration. In VCTF, you usually either see your base or the opponent base, but in VCTF4, you may end up seeing multiple bases at the same time depending on where you are on the map. This is even more likely in VCTF4 than in CTF4, because VCTF maps are usually more open. This naturally comes with a performance hit, therefore you should pay extra attention on a more performance related design that allows for sufficient view occlusion between the bases.
2 – Mapping guideline
This section covers how to start building a VCTF4 maps and which special actors you should place instead of the usual ones in order to make your map work with VCTF4.
2.1 – Getting started
Before you can place VCTF4 actors, you need to load the VCTF4 package into UnrealEd. There are two ways to do this:
- Open the Actor Browser and hit File → Open Package... in the menu and select the file OLTeamVehicleGames.u.
-
Close UnrealEd if it is opened, then open your UT2004.ini file and head to the [Editor.EditorEngine]. Find the list of
EditPackages and add the following line after that list:
EditPackages=OLTeamVehicleGamesThis will make UnrealEd load the VCTF4 package whenever you open it.
2.2 – Flag bases
You need to place the special CTF4 flag bases for the flags to work with VCTF4. Open the Actor Browser and navigate through the class tree to
Note that you do not need to place 4 flags on a VCTF4 maps. You can also create a "VCTF3" map by only placing 3 flags (leave the gold one out)! Your map will still need to use the VCTF4 prefix, however.
2.3 – Spawn points
You can use the usual StartingPoint class for spawn points. Use the following team numbers for the respective team:
1 - Blue
2 - Green
3 - Gold
2.4 – Vehicle factories
In order to have the especially skinned VCTF4 vehicles, you need to use different vehicle factory classes than usual. You can find them under
- Scorpion (stock UT2004 Scorpion with special skins and weapon effects)
- Lynx (modified Scorpion with a rocket launcher, found on various VCTF maps, original author unknown)
- Shock Scorpion (modified Scorpion with a Paladin cannon, found on various VCTF maps, original author unknown)
- Spammer (modified Scorpion with a fast plasma weapon, found on various VCTF maps, original author unknown)
- HellBender (stock UT2004 HellBender with special skins and weapon effects)
- Manta (stock UT2004 Manta with special skins and weapon effects)
- Raptor (stock UT2004 Raptor with special skins and weapon effects)
- Goliath (stock UT2004 Goliath with special skins)
- Leviathan (stock UT2004 Leviathan with special skins and weapon effects)
- Toilet Car (stock UT2004 Toilet Car with special skins)
- Paladin (UT2004 ECE Paladin with special skins and weapon effects)
- SPMA (UT2004 ECE SPMA (artillery) with special skins)
- Cicada (UT2004 ECE Cicada with special skins)
2.5 – Neutral vehicles
Unlike UT2004 itself, VCTF4 supports neutral vehicles out of the box. These are vehicles on the map that do not belong to any team and are not locked until somebody enters it. Teams can get them for a strategic advantage.
To make a vehicle neutral, after you placed its factory on the map, open the factory's properties window and set the option bNeutral in the OLVehicleFactoryt section to True.
2.6 – Laser turrets
Onslaught's laser turrets are not like the other vehicles, technically, and there need different treatment. To place a laser turret, use the following class:
2.7 – Minigun turrets
Minigun turrets belong to Assault technically and need special treatment when placing them as well. Use the following class for VCTF4 minigun turrets:
2.8 – Team monitors and banners
These are good for navigation help on the maps. Use the following special CTF4 classes like their original UT2004 counterparts:
Actor → Decoration → xMonitor → OLTeamsMonitor
Actor → Decoration → xTeamBanner → OLTeamXBanner
Appendix A – Map Layouts
What follows is a subjective evaluation of several VCTF4 map layouts that are already in use out there.
A.1 – The Cross
Since many casual VCTF maps are roughly linear, the most straightforward of all possible VCTF port layouts is the Cross. A good example for this is the
map VCTF4-R!P-Castle, which is included in the VCTF4 release package. The Cross layout separates the 4 bases from a central battlefield which needs
to be passed in order to get from one base to another:
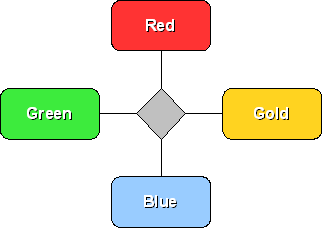
As straightforward as this might be, in practice it also proved to become boring pretty quickly. So the general recommendation is to go by a different layout and only use this if you really can't think of anything better.
A.2 – The Crosshair
Linear VCTF maps can also be converted into a Crosshair layout. This basically works like the Cross, except that additionally to a central connection
of all 4 bases, 2 respective bases are connected to each other as well:
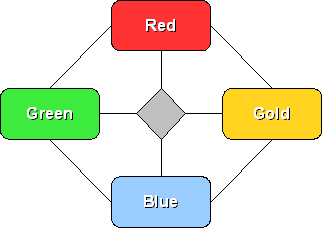
An example for this layout is the map VCTF4-ApA][RedRooms2, which is included in the VCTF4 release package. This layout allows for more escape
options and generally results in a more dynamic gameplay than the Cross layout. Usually, this layout allows the most occlusion possibilities and distributes
players further over the map, yielding a better performance.
A.3 – The Ring
This layout works without a central battlefield, two respective bases are directly connected to each other:
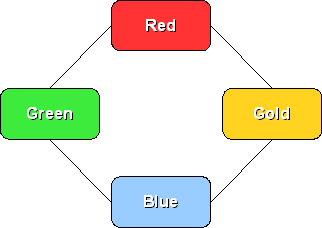
The interesting part in this layout is that a team has to pass another team's base in order to capture the flag of the team across. The team the base of which
has to be passed can catch such a capture attempt and capture that flag by itself if it needs to - or keep a team from winning. An example for this layout is the map
VCTF4-TheOrb, which is included in the VCTF4 release package. There is no example of a casual VCTF map converted to this layout so far.
A.4 – The Triangle
In case you choose to create a VCTF4 map with only 3 flags (and thus 3 teams), the Triangle is the most straightforward layout:
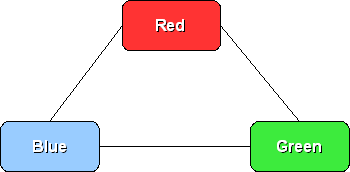
All bases are connected to each other, there may or may not be a central battle area. This works very well in practice and a good example is included in
the VCTF4 release package: VCTF4-MassDestruction-3Flags.